Introduction to Chocolate Thumbprint Cookies
Why Chocolate Thumbprint Cookies?
You might be wondering why you should get excited about Chocolate Thumbprint Cookies. Well, for starters, these cookies are not just delicious; they’re a delightful fusion of textures and flavors. The soft chocolate cookie base paired with a sweet filling in the center creates a treat that’s both comforting and indulgent. Picture a warm, freshly baked cookie, still soft in the middle, topped with a glossy burst of chocolate or jam—pure bliss! Whether you’re cozying up for a movie night or need a sweet pick-me-up during a busy work week, these cookies hit the spot every time.
A Personal Story About Baking Cookies
Baking has always been a cherished tradition in my family. I vividly remember spending Saturday afternoons in the kitchen with my grandmother, who would whip up all kinds of cookies. The experience was more than just baking; it was about sharing stories, laughter, and of course, the sweet aroma wafting through the house. One Saturday, we decided to tackle Chocolate Thumbprint Cookies. As we rolled the dough and made indents with our thumbs, it turned into a bonding moment that I still cherish. We ended up with flour on our faces and chocolate smeared on our hands, but the joy we felt while devouring those cookies made it all worthwhile.
The Joy of Homemade Treats vs. Fast Food
In the age of convenience, it’s easy to grab fast food and overlook the magic of a homemade treat. But think about it: when you bake cookies, you’re pouring your heart into them. According to a study by the National Institute of Health, homemade meals can lead to better dietary habits and overall well-being. The Chocolate Thumbprint Cookies are not just about satisfying your sweet tooth; they bring a sense of accomplishment and creativity to your kitchen. Plus, you know exactly what ingredients are going in! So why settle for pre-packaged sweets when you can create something incredible right at home?
For the full recipe, check out this delightful site. With just a bit of time and effort, you can recreate those heartwarming memories and craft delicious Chocolate Thumbprint Cookies that will have everyone coming back for more!

Ingredients for Chocolate Thumbprint Cookies
Essential ingredients for the cookies
When it comes to Chocolate Thumbprint Cookies, the right ingredients make all the difference. Here’s what you’ll need to whip up a delightful batch:
- Unsalted butter: 1 cup, softened to room temperature for a perfectly creamy texture.
- Granulated sugar: 2/3 cup, to add just the right amount of sweetness.
- Brown sugar: 1/3 cup, which lends a rich, molasses-like flavor.
- Vanilla extract: 1 teaspoon, enhancing the overall taste of your cookies.
- All-purpose flour: 1 ¾ cups, as the base for your chewy cookie dough.
- Cocoa powder: ¾ cup, providing that indulgent chocolatey essence.
- Salt: ½ teaspoon, balancing out the sweetness.
Ingredients for the chocolate ganache
The finishing touch for your Chocolate Thumbprint Cookies is the chocolate ganache, giving them a luxurious look and taste. Gather these essentials:
- Heavy cream: ½ cup, which creates a velvety texture.
- Semi-sweet chocolate chips: 1 cup, offering a rich chocolate flavor that melts beautifully.
Tips on sourcing quality ingredients
Quality matters! Opt for organic ingredients whenever possible, especially for butter and sugar, to enhance both flavor and sustainability. For chocolate, look for brands with high cocoa content and minimal additives. Websites like Fair Trade can be a great resource for finding ethically sourced chocolate. By investing in quality ingredients, you’re making not just a cookie, but a delightful experience. Happy baking!
Preparing Chocolate Thumbprint Cookies
When you’re in the mood for a sweet treat that feels both comforting and a touch sophisticated, Chocolate Thumbprint Cookies are definitely a go-to choice. Perfectly crisp on the outside and delightfully chewy on the inside, these cookies are bound to become a new favorite. Let’s dive into the process of creating these delectable delights!
Gather Your Ingredients
Before you begin, it’s critical to have everything ready. Here’s what you’ll need:
- 1 ¾ cups all-purpose flour
- ½ cup unsweetened cocoa powder
- ½ teaspoon baking powder
- ¼ teaspoon salt
- ½ cup unsalted butter (softened)
- ½ cup granulated sugar
- ½ cup packed brown sugar
- 2 large egg yolks
- 1 teaspoon vanilla extract
- About 1 cup chocolate chips (for the ganache)
Having these ingredients on hand not only saves time but also ensures you won’t have to make a last-minute grocery run. Talk about convenient!
Combine the Dry Ingredients
Start by whisking together the flour, cocoa powder, baking powder, and salt in a medium bowl. This step is crucial because it helps distribute the leavening agents and ensures a uniform texture in your cookies. It also activates those lovely chocolate flavors within the flour, enhancing the cookie’s richness.
Cream the Butter and Sugars
In a larger bowl, cream together the butter, granulated sugar, and brown sugar using an electric mixer on medium speed. You want this mixture to be light and fluffy—about 2-3 minutes should do the trick. The butter should reflect a pale yellow color, and this step is important because it introduces air into your cookie dough, which will contribute to that perfect bite.
Mix in the Egg Yolks and Vanilla
Next, beat in the egg yolks one at a time, followed by the vanilla extract. This is where the magic really starts to happen! The egg yolks add richness and moisture, while vanilla provides an aromatic backdrop that balances the robust chocolate flavor. Don’t be shy—give it a good mix until everything is well incorporated.
Incorporate the Dry Mixture
Slowly add your dry ingredients to the buttery mixture. It’s best to do this in increments to avoid a flour explosion. Mix until just combined, being careful not to overwork the dough. A few specks of flour are okay; they’ll absorb as the dough rests.
Shape and Chill the Cookie Dough
Once mixed, it’s time to scoop and shape! Roll the dough into balls about 1 inch in diameter and place them on a lined baking sheet. After shaping, it’s a smart idea to chill the cookie dough for at least 30 minutes. This step helps the cookies maintain their shape while baking.
Bake the Cookies to Perfection
Preheat your oven to 350°F (175°C). Once your dough is chilled, make a small indentation in the center of each cookie ball with your thumb (or the back of a teaspoon if you prefer). Bake for about 10-12 minutes or until the edges are set. The cookies may look a little puffed up, but don’t worry—this is just part of the process!
Prepare the Chocolate Ganache
While your cookies are cooling, it’s time to indulge in some chocolate ganache. Simply heat the chocolate chips in a microwave-safe bowl with a splash of heavy cream or milk until just melted. Stir until smooth and silky—this ganache will be the cherry on top.
Fill and Chill the Cookies
Once your cookies are out of the oven and cooled, fill each indentation with the luscious ganache. After filling, pop them in the fridge for a bit to let the chocolate set nicely.
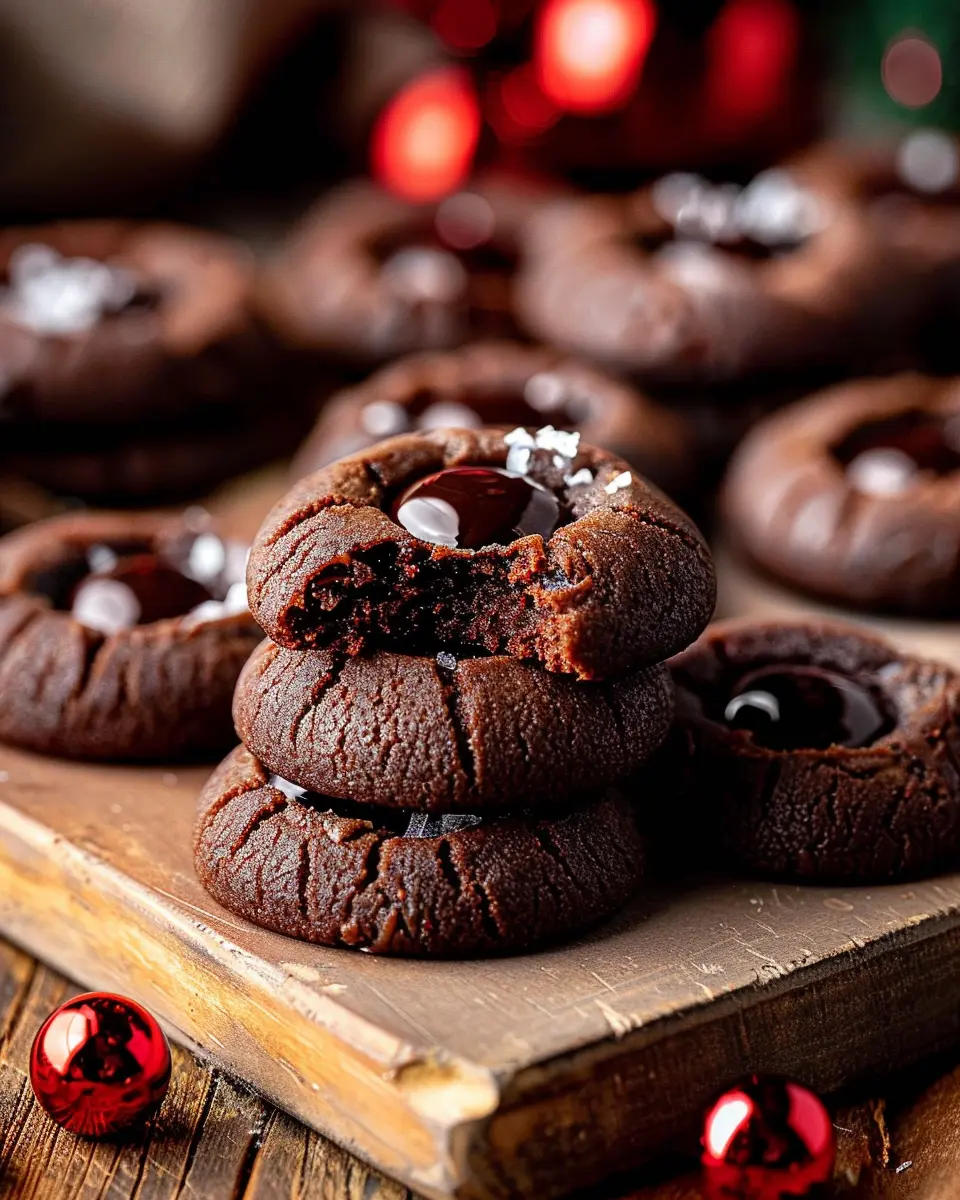
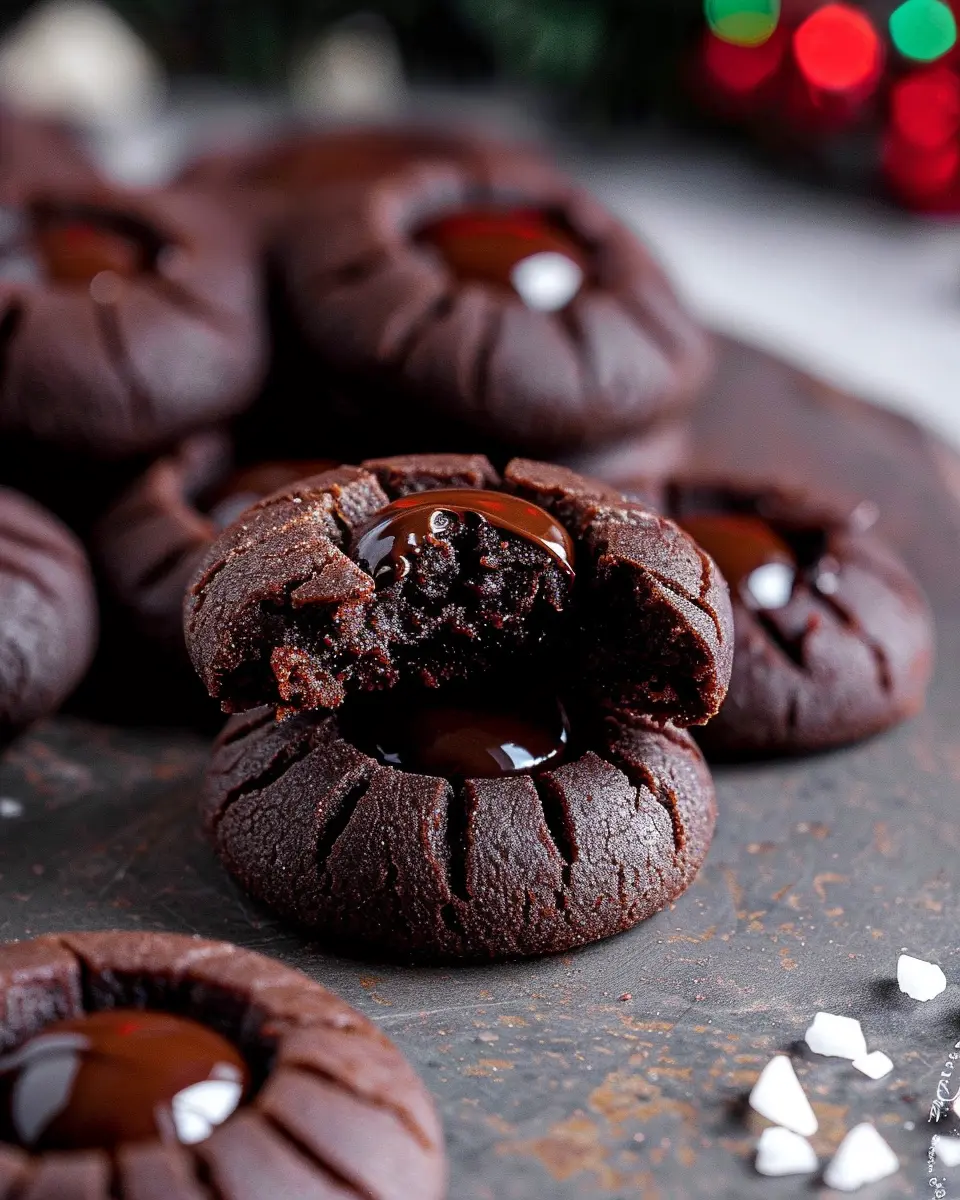
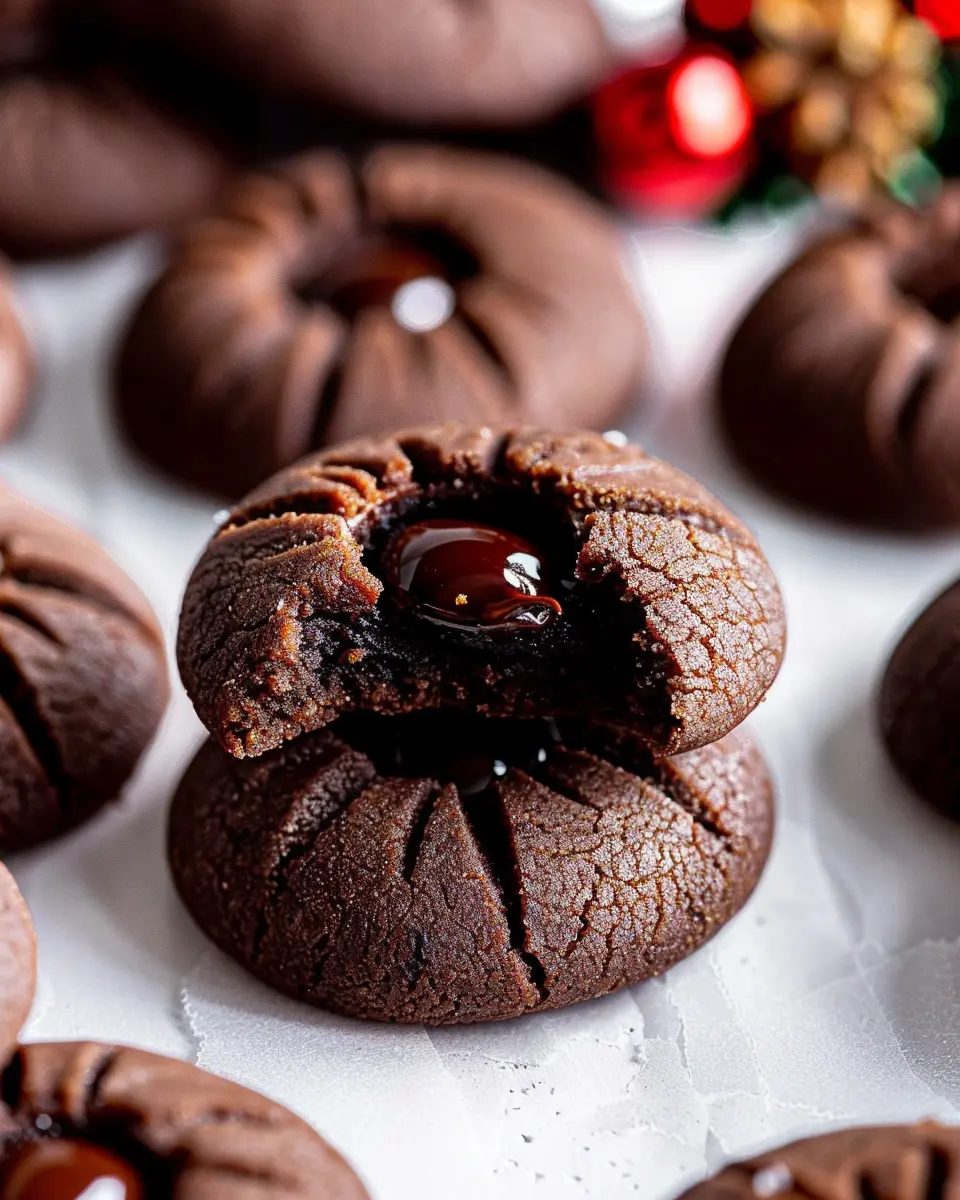
Admire and Enjoy Your Cookies!
Finally, take a moment to admire your handiwork! The contrast of the shiny chocolate ganache against the rich cookies is undeniably tempting. Whether you share these delightful Chocolate Thumbprint Cookies with friends, family, or save them all for yourself (we won’t judge!), they are sure to impress.
As you savor each bite, take a moment to appreciate the process that brought your cozy cookies to life. Happy baking!
For further enticing recipes, be sure to check out resources like Food Network or Serious Eats for inspiration on new baking adventures!
Variations on Chocolate Thumbprint Cookies
Chocolate Thumbprint Cookies serve as a delightful canvas for endless flavor possibilities. Let’s explore some creative variations that will satisfy every craving!
PB&J Thumbprint Cookies
Craving nostalgia? Transform your chocolate thumbprints into PB&J Thumbprint Cookies! Simply use a smooth layer of peanut butter in the center before baking. Once out of the oven, fill the thumbprint with your favorite jelly or jam, like strawberry or raspberry. It’s a delightful twist on a classic, bringing back childhood memories with every bite.
Nutella-filled Thumbprint Cookies
For chocolate lovers, why not elevate your chocolate thumbprint cookies even further by adding Nutella? After baking, place a dollop of Nutella in each thumbprint while still warm. The rich, creamy chocolate-hazelnut spread provides a unique texture and flavor that pairs perfectly with the cookie’s chocolate base. It’s a sweet indulgence that’s hard to beat!
Gluten-free Alternatives for Thumbprint Cookies
If you’re looking for a gluten-free option, don’t fret! Swap regular flour for almond flour or a gluten-free blend. These alternatives create a light and chewy texture that is just as satisfying. Be sure to check the labels to ensure that your ingredients meet gluten-free standards. Resources like GlutenFreeWatchdog can help confirm your flour’s safety.
Seasonal Variations to Try Out
As the seasons change, so can your thumbprint cookies! Try adding spices like cinnamon or nutmeg in the fall, or incorporate fresh berries in the summer for a refreshing twist. You can also experiment with seasonal flavors, such as peppermint during the holidays or caramel in the winter. The possibilities are endless!
Whether you stick with traditional chocolate or try these creative variations, each cookie promises a delightful experience. Happy baking!
Baking Tips and Notes for Chocolate Thumbprint Cookies
Baking Chocolate Thumbprint Cookies can be an absolute delight, but a few tips can elevate your cookie game to perfection!
Measuring Ingredients Correctly
Getting the correct measurements is crucial. Use a kitchen scale for accurate results, especially with flour. A cup of flour can weigh anywhere from 120 to 150 grams depending on how you scoop it. For liquid ingredients, measuring cups with clear markings can help avoid over-pouring.
Common Mistakes to Avoid
Many bakers make the rookie mistake of overmixing the dough, which can lead to tougher cookies. Mix just until combined to keep them tender. Also, remember to chill your cookie dough for at least 30 minutes; this step prevents spreading and keeps the thumbprint shape intact.
Storage Tips for Keeping Cookies Fresh
To ensure your Chocolate Thumbprint Cookies stay soft and delicious, store them in an airtight container at room temperature. If you have a bigger batch, consider freezing them for up to three months. Just wrap each cookie in plastic wrap and pop them in a freezer bag to maintain freshness.
For more baking tips and suggestions, feel free to check resources like King Arthur Baking or The Bake Trail. Happy baking!
Serving Suggestions for Chocolate Thumbprint Cookies
Pairing with Coffee or Tea
One of the greatest joys of enjoying your Chocolate Thumbprint Cookies is finding the perfect beverage to accompany them. A rich cup of coffee or a fragrant herbal tea can enhance their deep chocolate flavor. For coffee lovers, consider a smooth cappuccino or a hint of vanilla latte, which balances the cookie’s sweetness. If tea is more your style, opt for a classic Earl Grey or a mint infusion, both of which provide a lovely contrast.
Creative Ways to Present Your Cookies
Presentation can elevate your Chocolate Thumbprint Cookies from delicious to delightful. Consider arranging them on a decorative platter, layered with parchment paper for an elegant touch. You can even wrap a few cookies in clear cellophane tied with a ribbon to create charming little gifts or favors. Another idea? Create a cookie jar display—stack them in a glass jar and place them on your kitchen counter for an inviting treat.
Suggestions for Sharing with Friends and Family
Sharing your Chocolate Thumbprint Cookies can turn a simple snack into a special occasion. Host a cookie swap with friends or pack a batch to surprise colleagues at work. These cookies are perfect for potlucks, where everyone will surely appreciate the chocolaty goodness. If you really want to spread the joy, consider taking some to your local community center or a neighbor who could use a sweet pick-me-up. After all, what’s better than bringing a smile to someone’s face with a tasty treat?
By using these serving suggestions, your Chocolate Thumbprint Cookies can become the highlight of any gathering! If you’re looking for more inspiration, check out this resource on cookie pairings.
Time Breakdown for Making Chocolate Thumbprint Cookies
Creating Chocolate Thumbprint Cookies is a delightful and rewarding process. Here’s a concise breakdown of the time you’ll need to set aside:
Preparation Time
Getting started takes approximately 15-20 minutes. This includes gathering your ingredients—like flour, cocoa powder, and chocolate for filling—and mixing everything together.
Chill Time
After mixing, let the dough rest in the refrigerator for about 30-60 minutes. This is crucial for easier handling and better texture, ensuring that your cookies turn out perfectly!
Baking Time
When you’re ready, bake these delightful cookies for around 12-15 minutes. You’ll know they’re done when they’re slightly firm to the touch but still soft.
Total Time
In total, expect to spend about 1 hour and 45 minutes from start to finish. Most of this is passive time—perfect for prepping other snacks or simply enjoying a well-deserved break!
With this time breakdown in hand, you’re well on your way to enjoying these delicious Chocolate Thumbprint Cookies. Be sure to check out this source for more tips on baking techniques!
Nutritional Facts for Chocolate Thumbprint Cookies
Suggested Serving Size
When enjoying Chocolate Thumbprint Cookies, think of a sensible serving size: try starting with one or two cookies. This way, you can savor the rich flavors without going overboard.
Calories and Sugar Content
Each cookie typically contains around 150 calories and about 10 grams of sugar. While that’s a delightful treat, it’s worth being mindful of your total sugar intake throughout the day, especially if you’re watching your diet. For more insight into sugar consumption recommendations, check out the American Heart Association’s guidelines here.
Tips for Healthier Baking Options
Want to make your Chocolate Thumbprint Cookies a bit healthier? Consider these tips:
- Reduce Sugar: Try cutting the sugar by a quarter or experimenting with natural sweeteners like honey or maple syrup.
- Swap Ingredients: Use whole wheat flour for added fiber, or substitute coconut oil for butter to reduce saturated fat.
- Add Nutrients: Toss in some chopped nuts or oats for extra protein and heart-healthy fats.
Making simple adjustments can help you enjoy these delicious cookies guilt-free!
FAQs about Chocolate Thumbprint Cookies
Can I make these cookies ahead of time?
Absolutely! Chocolate Thumbprint Cookies are perfect for batch baking. You can prepare the dough, roll it into balls, and refrigerate them for up to three days before baking. If you want to store them for an even longer period, freeze the cookie dough balls. Just place them on a baking sheet to freeze individually, then transfer them to a freezer bag for up to three months. When you’re ready to bake, no need to thaw; just add a couple of extra minutes to the baking time. This makes it easy to whip up fresh cookies anytime the craving strikes!
How do I fix cookies that spread too much?
If your Chocolate Thumbprint Cookies end up too flat, don’t fret! Several factors can contribute to spreading. Ensure your butter isn’t overly soft; it should be at room temperature but still slightly firm. Chilling the dough for at least 30 minutes before baking can also help solidify the fat and control spread. Sometimes, adding a bit more flour can do the trick too. Just remember, every oven and ingredient can differ, so adjustments may be necessary!
What’s the best way to store leftover cookies?
To keep your Chocolate Thumbprint Cookies fresh, store them in an airtight container at room temperature. They can last up to a week, but let’s be honest; they probably won’t last that long! For longer storage, you can freeze them. Layer the cookies between parchment paper in a freezer-safe container, and you can enjoy them for up to three months. When you’re ready for a sweet treat, just thaw them at room temperature or warm them briefly in the oven for a freshly baked experience.
For more tips and tricks on cookie baking, check out resources like King Arthur Baking or Food Network for valuable insights!
Conclusion on Chocolate Thumbprint Cookies
Recap of the joy of baking cookies
Baking is more than just a culinary task; it’s a delightful journey that warms the heart and fills the home with inviting aromas. There’s something almost magical about transforming basic ingredients into delicious treats like Chocolate Thumbprint Cookies. Each bite encapsulates joy, nostalgia, and those sweet moments shared with loved ones.
Encouragement to try the recipe
I encourage you to take the plunge and whip up a batch! The process is rewarding and perfect for beginners and seasoned bakers alike. Plus, the pride of serving homemade goodies is unbeatable.
Final thoughts on homemade treats vs. fast food
In a world full of fast food options, embracing homemade treats fosters creativity and connection. Chocolate Thumbprint Cookies are not only a delicious choice but also a reminder of the care and passion that goes into baking. So grab your apron, gather your ingredients, and create something memorable today! For more cookie inspiration, check out BBC Good Food’s cookie recipes.
PrintChocolate Thumbprint Cookies: The Best Indulgent Treat for Everyone

A delightful recipe for chocolate thumbprint cookies that everyone will love!
- Prep Time: 30 minutes
- Cook Time: 15 minutes
- Total Time: 45 minutes
- Yield: 24 cookies
- Category: Dessert
- Method: Baking
- Cuisine: American
- Diet: Vegetarian
Ingredients
- 1 cup unsalted butter
- 1 cup granulated sugar
- 1 teaspoon vanilla extract
- 2 cups all-purpose flour
- 1/2 cup cocoa powder
- 1/4 teaspoon salt
- 1 cup chocolate chips
Instructions
- Preheat the oven to 350°F (175°C).
- In a bowl, cream the butter and sugar together until fluffy.
- Mix in the vanilla extract.
- Sift together the flour, cocoa powder, and salt; add to the wet mixture.
- Form dough into balls and place on a baking sheet.
- Press your thumb into each ball to create an indentation.
- Bake for 12-15 minutes until set.
- Once cooled, fill the thumbprints with melted chocolate chips.
Notes
- Allow cookies to cool completely before adding chocolate.
- For a unique flavor, add a pinch of cinnamon to the dough.
Nutrition
- Serving Size: 1 cookie
- Calories: 150
- Sugar: 10g
- Sodium: 50mg
- Fat: 8g
- Saturated Fat: 5g
- Unsaturated Fat: 2g
- Trans Fat: 0g
- Carbohydrates: 20g
- Fiber: 1g
- Protein: 2g
- Cholesterol: 30mg