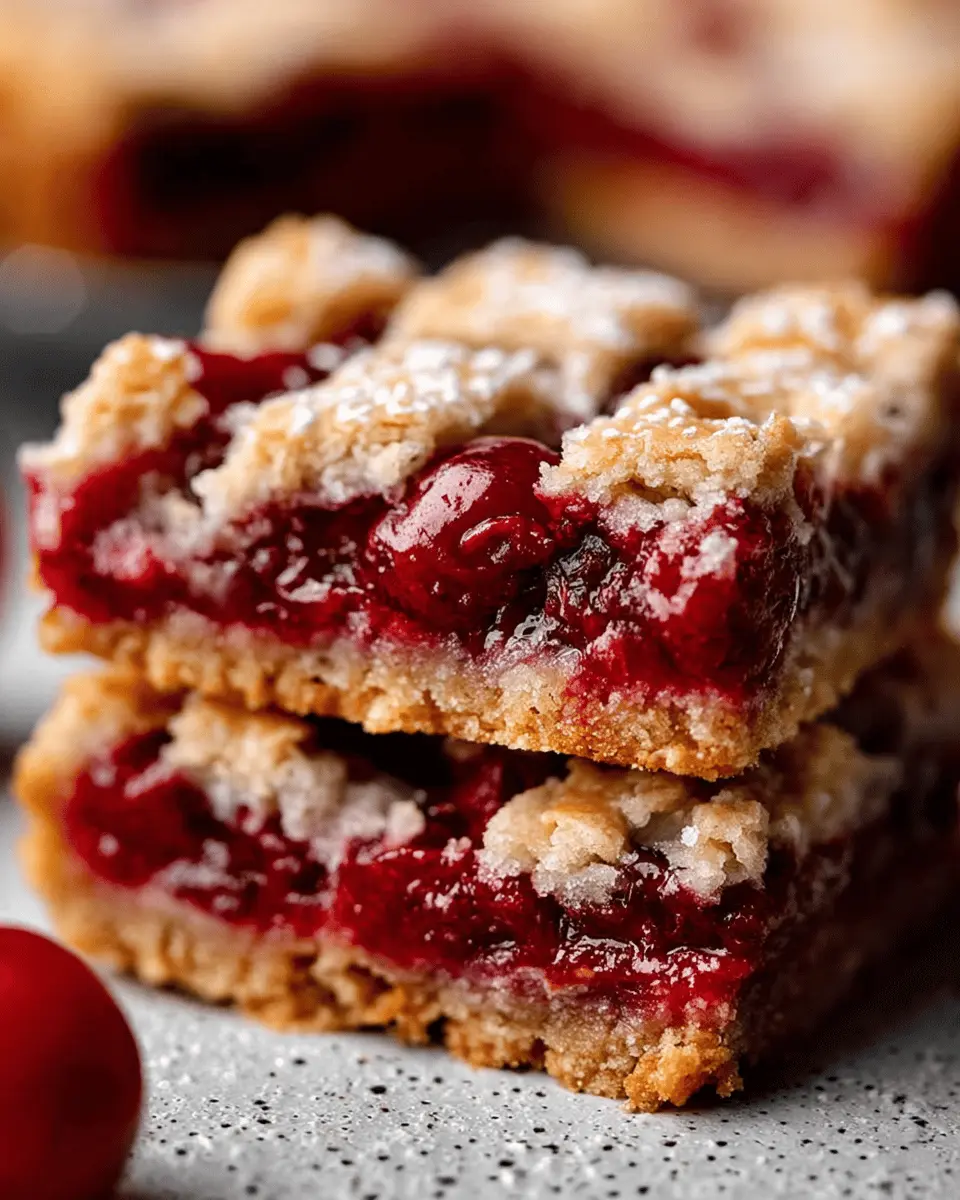
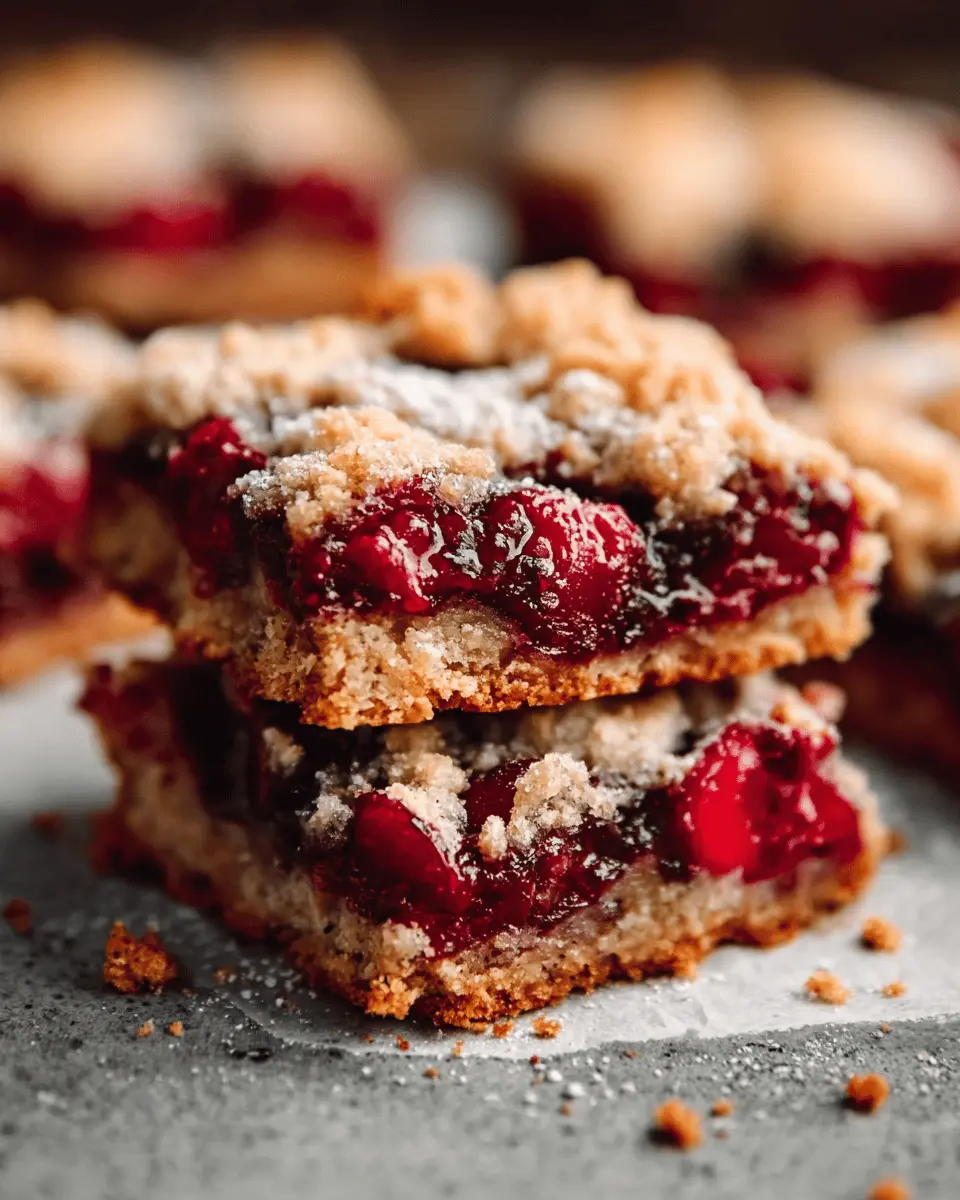
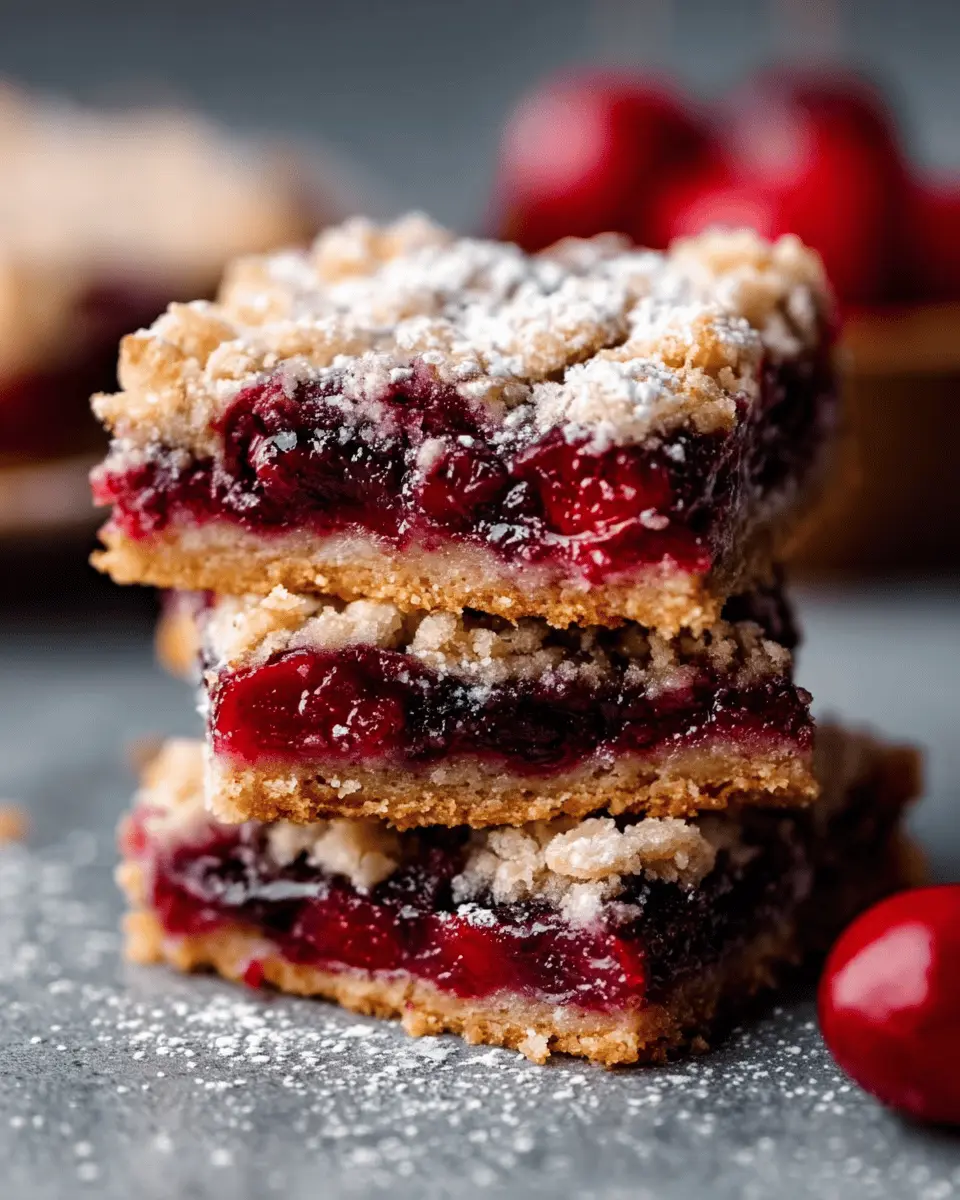
Introduction to Cherry Pie Bars
If you’re a busy young professional always on the go, finding the perfect treat can be a challenge. That’s where Cherry Pie Bars come to the rescue! These delightful desserts not only satisfy your sweet tooth but also fit seamlessly into your lifestyle. With their easy-to-follow recipe and portable format, you can whip them up in no time and take them with you to enjoy at work or during your daily commute.
Why Cherry Pie Bars are a Perfect Treat for Young Professionals
First off, let’s talk convenience. Cherry Pie Bars are the ultimate handheld dessert. Unlike traditional pie that requires elaborate slicing and serving, these bars can be enjoyed straight from the pan or wrapped up and tossed into your bag. Imagine reaching for a sweet, tangy bite during your lunch break or a cozy after-dinner treat—no fuss, no mess.
But it’s not just about practicality. The flavors are what truly set Cherry Pie Bars apart. The combination of tart cherries with a crumbly, buttery crust evokes nostalgia, transporting you back to simpler times. Did you know that cherries are not only delicious but also packed with antioxidants? Research from the Journal of Agricultural and Food Chemistry highlights their health benefits, so you can indulge a little guilt-free!
When you’re juggling work commitments, social plans, and that endless to-do list, quick and satisfying recipes can save the day. These bars can be made in advance and stored in an airtight container for several days. Knowing you have something sweet waiting for you can make your busy weeks feel a bit brighter.
To make your preparation even easier, consider batching these up for the week ahead. After all, who said dessert has to be complicated? If you have spare time on a Sunday, you can easily create multiple Cherry Pie Bars to enjoy throughout the week.
For extra tips on making your baking process smoother, check The Kitchn for additional kitchen hacks and recipes. So roll up your sleeves and prepare to become the dessert hero of your friend group; a few Cherry Pie Bars are just what you need!
Ingredients for Cherry Pie Bars
Essential ingredients for delightful Cherry Pie Bars
Making Cherry Pie Bars is a delightful way to enjoy the taste of summer all year round. Here’s what you’ll need to whip up this scrumptious dessert:
-
Fresh Cherries: Whether you opt for sweet or tart, using high-quality cherries is key to achieving that rich, fruity flavor. If cherries are out of season, frozen cherries work well too—just make sure to thaw and drain them properly.
-
Granulated Sugar: This is essential for sweetening both the cherry filling and the crust. You can adjust the amount based on your taste or the cherry variety you choose.
-
All-Purpose Flour: This is the backbone of your crust. A good balance here ensures a crumbly, tender base that holds all the goodness together.
-
Butter: Unsalted butter adds richness to the crust. Be sure to keep it chilled before using to achieve that flaky texture.
-
Baking Powder and Salt: These help with the rise and flavor, creating a perfect balance in your Cherry Pie Bars.
-
Vanilla Extract: A splash enhances the sweetness of the cherries and complements the buttery crust.
For recipes and tips on using cherries effectively, check out Cherry Marketing Institute. Now, let’s dive into the preparation!
Step-by-step Preparation of Cherry Pie Bars
Creating the ultimate Cherry Pie Bars is simpler than you might think. With a few fresh ingredients and some kitchen creativity, you can indulge in these delightful treats at home. Here’s a comprehensive guide to make your baking experience smooth and enjoyable!
Preheat and Prepare the Baking Pan
Begin by preheating your oven to 350°F (175°C). This is crucial because a preheated oven ensures that your Cherry Pie Bars cook evenly, enhancing their flavor and texture. While the oven warms, take a 9×13-inch baking pan and lightly grease it with butter or line it with parchment paper. This step makes removing the bars much easier after baking.
Creaming Butter and Sugar
In a mixing bowl, combine 1 cup of softened butter and 1 cup of granulated sugar. Using an electric mixer, cream them together for about 2-3 minutes until the mixture is light and fluffy. This process aerates the butter and sugar, contributing to a tender base for your Cherry Pie Bars. It’s like laying the perfect foundation for a house — the sturdier the base, the better the rest of the structure will be!
Adding Eggs and Extracts
Once your butter and sugar are fluffy, it’s time to add 2 large eggs and 1 teaspoon of vanilla extract. Beat the mixture until everything is well incorporated. You can also consider adding a splash of almond extract for an extra layer of flavor — it pairs wonderfully with cherries! This is where your bars start to take on that lovely, rich character.
Mixing in Dry Ingredients
In another bowl, whisk together the dry ingredients: 2 cups of all-purpose flour, 1/2 teaspoon of baking powder, and 1/2 teaspoon of salt. Gradually add this mixture to your wet ingredients, stirring until just combined. Avoid overmixing, as this can lead to tough bars. Nobody wants a workout for their jaws!
Forming the Crust
Spread about two-thirds of your dough into the prepared pan, pressing it down evenly to form the crust. This process is pretty straightforward; just keep your hands lightly floured to prevent sticking. Think of this as pressing the foundation of your cherry-loving empire!
Layering the Cherry Pie Filling
Now for the star of the show: the cherry filling. You can use canned cherry pie filling for convenience, or if you’re feeling adventurous, make your homemade version! Simply spread the filling evenly over the crust. Make sure to leave a little space near the edges to avoid spillage during baking.
Crumbling the Topping
With the remaining dough, create a crumble topping. Simply take small chunks of the dough and sprinkle them evenly across the cherry filling. This adds a lovely texture and flavor contrast to your Cherry Pie Bars — crunchy and sweet, a fantastic combo!
Baking to Perfection
Put your pan in the oven and bake for 35-40 minutes, or until the top is golden brown. Your kitchen will start to fill with warm, inviting scents — a signal that deliciousness is on the way! Allow the bars to cool in the pan for about 30 minutes before slicing.
Making the Glaze
While your bars are cooling, why not whip up a simple glaze? Mix 1 cup of powdered sugar with 2 tablespoons of milk and a splash of vanilla extract. Drizzle it over the cooled bars for an additional pop of sweetness. It’s like the cherry on top, even if technically there aren’t any cherries on top!
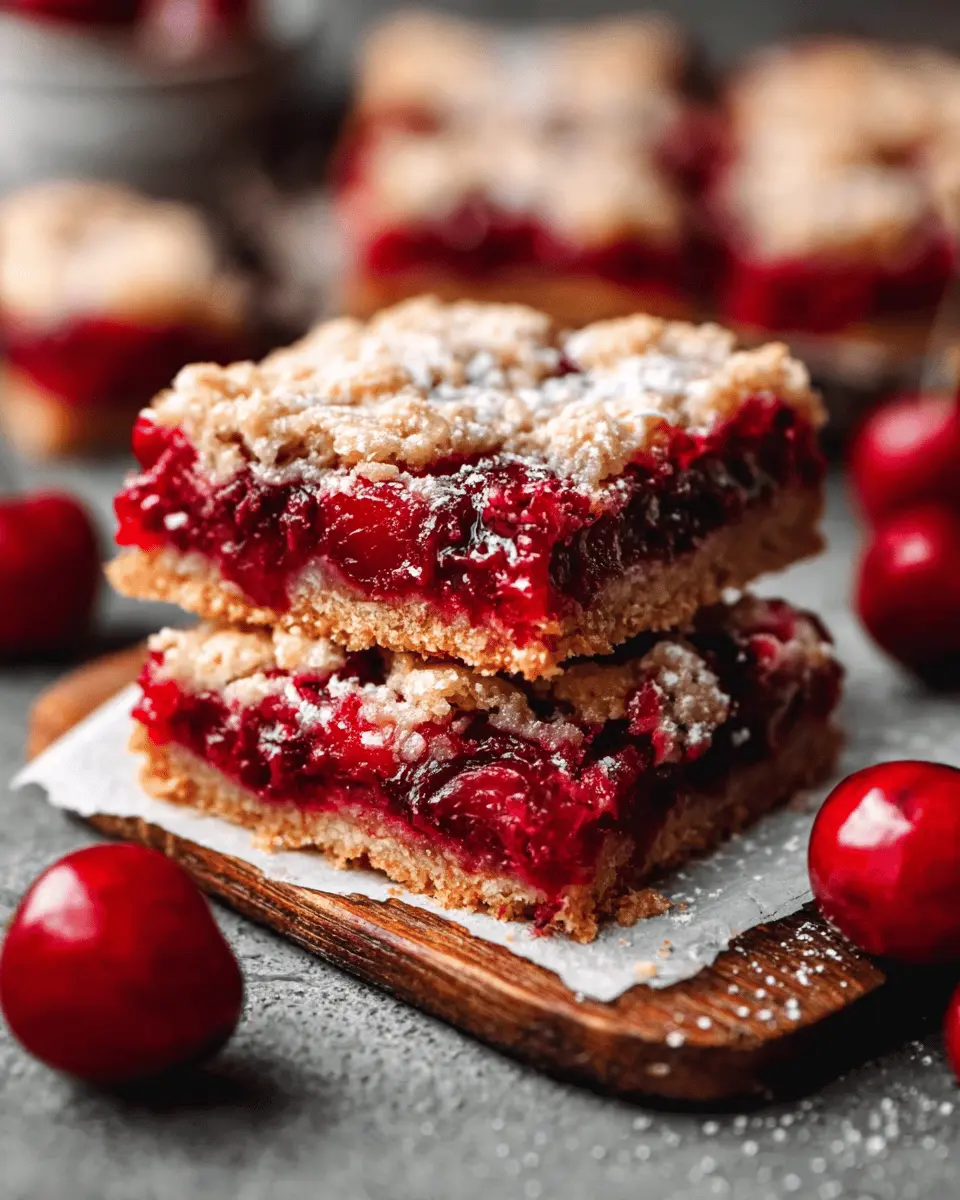
Serving Suggestions
Your perfected Cherry Pie Bars are now ready to serve! They can be enjoyed warm or at room temperature. Pair them with a scoop of vanilla ice cream or serve them alongside a cup of coffee for a delightful afternoon treat. They also make for a scrumptious addition to potlucks or gatherings.
With this step-by-step guide, you’re not just baking; you’re crafting memories. So gather your ingredients and dive into baking your own Cherry Pie Bars — it’s a delightful project that’s sure to impress! If you’re keen on more sweet recipes, check out The Spruce Eats for inspiration! Happy baking!
Variations of Cherry Pie Bars
If you love the classic taste of cherry pie but want to switch things up, these delightful variations of Cherry Pie Bars are perfect for you! They cater to different tastes and dietary needs while keeping the essence of that nostalgic flavor.
Cherry Almond Crunch
Combine the sweet and tart cherry filling with a hint of almond extract for a delightful twist. Topped with a crunchy almond streusel, these Cherry Pie Bars add a satisfying crunch that contrasts beautifully with the soft cherries. To make this variation, simply fold in some sliced almonds into your crumble topping and drizzle a bit of almond extract into the cherry filling. Trust me, the aroma alone will make your kitchen feel like a warm hug!
Chocolate Cherry Bliss
Cocoa lovers rejoice! For a decadent treat, think about adding chocolate to your Cherry Pie Bars recipe. Melt some dark chocolate and swirl it into the cherry filling before baking. The pairing of rich chocolate with tart cherries creates a mouthwatering experience. Finish them off with a dusting of powdered sugar for an elegant presentation. If you’re feeling adventurous, consider adding a sprinkle of sea salt on top to enhance the flavors!
Gluten-Free Cherry Pie Bars
Eating gluten-free? No problem! Substitute all-purpose flour with a blend of gluten-free flours. Almond and coconut flour work wonders here, giving your Cherry Pie Bars a lovely texture. Just be sure to adjust the liquid ingredients as necessary, as gluten-free flours can absorb more moisture. Check out resources like the Gluten Intolerance Group for tips on gluten-free baking.
These variations not only bring a fresh perspective to a classic recipe but also cater to various preferences. So why not try one (or all) of these delicious options next time you’re in the mood for Cherry Pie Bars?
Cooking Tips and Notes for Cherry Pie Bars
How to Make the Dough More Manageable
Making the perfect dough for your Cherry Pie Bars can sometimes feel like a daunting task, but it doesn’t have to be! Here are some simple tips to help you achieve a smoother experience:
- Chill Your Ingredients: Before mixing, chill your butter and flour. Cold butter helps create flaky layers.
- Use Parchment Paper: Lining your pan with parchment will make it easier to lift out the bars later. Plus, it saves you from a sticky mess!
Choosing the Right Cherry Filling
The filling is where your Cherry Pie Bars truly shine, so make sure to select the best cherries:
- Fresh vs. Canned: While fresh cherries are delicious, canned tart cherries can save you time. Look for brands with no added sugars for a healthier option.
- Flavor Boosts: Consider adding a touch of vanilla extract or almond extract to your filling for extra depth. A little citrus zest can also brighten the flavor.
For more insights on cherry varieties, check out resources from The Cherry Marketing Institute. Happy baking!
Serving Suggestions for Cherry Pie Bars
Ice Cream Pairing Options
When it comes to serving your delightful Cherry Pie Bars, consider elevating the experience with a scoop of ice cream. The creamy texture and sweet flavors can create a fantastic contrast to the tartness of the cherries. Here are some delicious pairing options:
- Vanilla: A classic choice that complements the rich cherry filling perfectly.
- Michigan Cherry: For those cherry lovers out there, this choice doubles down on the fruity goodness.
- Salted Caramel: The sweet and salty flavors can add an unexpected depth to your dessert experience.
If you have time, try homemade ice cream for a personal touch. Check out sites like Serious Eats for creative recipes!
Best Drinks to Complement Your Bars
Wondering what to sip while enjoying your Cherry Pie Bars? Here are some fantastic non-alcoholic options that pair well and enhance the flavors:
- Sparkling Water: This refreshing drink helps cleanse your palate between bites.
- Iced Herbal Tea: Flavors like hibiscus or chamomile can beautifully offset the tartness of the cherries.
- Lemonade: Tart meets sweet in this classic combination, creating a delightful balance.
Next time you’re hosting a get-together, think about these serving suggestions to make your Cherry Pie Bars the star of the show!
Time Breakdown for Cherry Pie Bars
Preparation Time
Making Cherry Pie Bars starts off easy and fun! You’ll need about 15-20 minutes to gather ingredients and prep the filling. Chopping cherries and mixing your base can be a delightful experience, especially as the aroma of sweet cherries fills your kitchen. Don’t forget to check out tips on selecting the best cherries from sources like the USDA for quality recommendations.
Baking Time
Once prepared, the real magic happens in the oven. Bake your Cherry Pie Bars for 25-30 minutes, or until they’re golden brown and bubbly. You’ll want to smell the deliciousness wafting through your home while they cook — trust me, it’s part of the joy!
Total Time
In total, you can expect to invest about 45-50 minutes from start to finish. This quick turnaround means you can whip up a tasty dessert in no time. Perfect for those busy weeknights when you crave a sweet treat!
Nutritional Facts for Cherry Pie Bars
Calories per Serving
When it comes to enjoying Cherry Pie Bars, knowing the caloric content can help you balance your diet without sacrificing the treats you love. Each serving typically contains around 200 to 250 calories. This makes them a delightful, yet manageable, indulgence during a busy day or a cozy night in.
Key Nutrients
These Cherry Pie Bars not only satisfy your sweet tooth but also pack in some solid nutrition. Here are some key nutrients you can find:
- Fiber: With cherries as a star ingredient, you’ll benefit from dietary fiber, promoting digestive health.
- Vitamins: Rich in vitamin C, cherries can boost your immune system and contribute to healthy skin.
- Antioxidants: Cherries are high in antioxidants, which may help reduce inflammation and improve heart health.
For more detailed insights on the nutritional benefits of cherries, check out Healthline’s comprehensive guide on fruits. Enjoying your Cherry Pie Bars feels just a bit sweeter when you recognize they’re contributing positively to your well-being!
FAQs about Cherry Pie Bars
Can I use fresh cherries instead of pie filling?
Absolutely! Using fresh cherries in your Cherry Pie Bars gives a delightful burst of flavor. Just be sure to pit and slice them before mixing. You can also sweeten them slightly with sugar, especially if they aren’t super ripe. Some folks prefer to use a little cornstarch to thicken the filling and prevent it from becoming too runny. If you’re interested in learning more about how fresh fruits can change recipes, check out some expert insights from Sally’s Baking Addiction.
How do I store leftover Cherry Pie Bars?
To keep your Cherry Pie Bars fresh, store them in an airtight container at room temperature for 2-3 days. If you live in a warmer area, you might want to refrigerate them to maintain that perfect texture. Just ensure they are well-covered to avoid drying out. If you happen to have a lot left, you might be setting yourself up for some delicious snacks throughout the week!
Can I freeze Cherry Pie Bars?
Definitely! Freezing your Cherry Pie Bars is a fantastic option if you want to save some for later. Just allow them to cool completely, then wrap them tightly in plastic wrap or aluminum foil. Alternatively, you can use a freezer-safe container. They can keep in the freezer for about 2-3 months, making them a perfect make-ahead treat. When you’re ready to enjoy, simply thaw them in the fridge overnight, and they’ll be just as scrumptious as the day you made them!
These FAQs should clarify any doubts you have and help you enjoy your baking adventure with Cherry Pie Bars!
Conclusion on Cherry Pie Bars
Final Thoughts and Encouragement to Try Making Them
If you’re looking for a fun and delicious dessert that brings a pop of flavor to your gatherings, Cherry Pie Bars are a fantastic choice. These treats combine the classic flavors of cherry pie with the easy-to-handle format of a bar, making them perfect for sharing with friends or enjoying solo.
As you embark on your baking adventure, remember that the best part is tasting the sweet rewards of your labor! Don’t hesitate to personalize the recipe—try adding a sprinkle of cinnamon or using different fruit fillings. If you’re ready to give these bars a shot, find more inspiration at sites like Serious Eats and Food Network. Happy baking!
PrintCherry Pie Bars: Easy and Indulgent Family Favorite Recipe
Delicious cherry pie bars that are easy to make and a family favorite!
- Prep Time: 15 minutes
- Cook Time: 35 minutes
- Total Time: 50 minutes
- Yield: 12 servings
- Category: Dessert
- Method: Baking
- Cuisine: American
- Diet: Vegetarian
Ingredients
- 2 cups all-purpose flour
- 1 cup granulated sugar
- 1/2 teaspoon salt
- 1 cup unsalted butter, softened
- 1 teaspoon vanilla extract
- 2 cups cherry pie filling
Instructions
- Preheat your oven to 350°F (175°C).
- In a large bowl, mix together the flour, sugar, and salt.
- Add the softened butter and vanilla extract, mixing until crumbly.
- Press half of the mixture into the bottom of a greased baking pan.
- Spread the cherry pie filling over the crust.
- Sprinkle the remaining crumb mixture on top.
- Bake for 30-35 minutes, or until golden brown.
- Allow to cool before cutting into bars.
Notes
- Serve with whipped cream or ice cream for added indulgence.
- Store leftovers in an airtight container.
Nutrition
- Serving Size: 1 bar
- Calories: 250
- Sugar: 15g
- Sodium: 200mg
- Fat: 10g
- Saturated Fat: 6g
- Unsaturated Fat: 4g
- Trans Fat: 0g
- Carbohydrates: 36g
- Fiber: 1g
- Protein: 2g
- Cholesterol: 30mg